Use SAP in Semarchy xDI
You can use the following SAP objects in Designer:
- Tables
-
Classic database tables storing SAP data.
- IDocs
-
Documents.
- BAPIs/RFCs
-
Services available to external systems for integration.
- DataSources
-
Read-only structured data intended for reporting purposes.
Tables
In xDI, SAP tables work similarly to other database tables.
Write to a table
Write data to an SAP table in a similar way to other database technologies.
SAP does not support load steps, so make you add the NO_LOAD tag to the target SAP table datastore in the mapping:

Define your integration template parameters as needed.

The following parameters are available:
| Parameter Name | Default | Description |
|---|---|---|
Truncate target before |
False |
If enabled, all data in the SAP target table is deleted before loading the source database data. |
Fetch Size |
0 |
Number of lines sent on each table fetch. Each write request to the SAP table is truncated to match the defined size. This parameter helps to avoid memory issues when loading significant data volumes. The default setting writes all data in one step. |
SAP Date Format |
yyyyMMdd |
Date format for SAP. |
Rdbms Date Format |
yyyy-MM-dd |
Date format for the database. |
SAP Time Format |
HHmmss |
Time format for SAP. |
Rdbms Time Format |
HH:mm:ss |
Time format for the database. |
Data Line Max Size |
255 |
Maximum number of characters in an SAP field. |
Action |
M |
What mode to use when writing to the SAP table. Possible choices are:
|
Read from a table
Read data from an SAP table like you would with other database technologies.

Here is an example that reads data from an SAP table and writes it to a target database.
First, reverse your desired source SAP table.

Create a mapping into which you drag and drop the SAP table. It appears as any other source database table.

Drag and drop your target table to the mapping, and map the fields according to your requirements. The next screenshot of this example has a target stage on an HSQL demo database:

Define your load template parameters as needed.
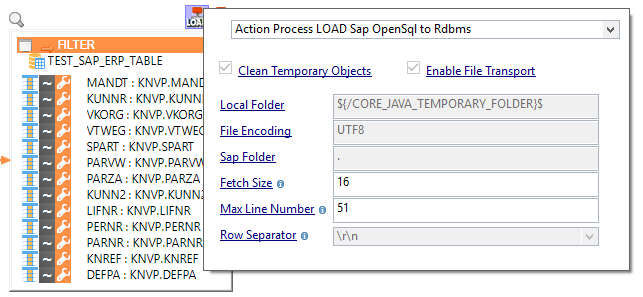
The following parameters are available:
| Parameter Name | Default | Description |
|---|---|---|
Local Folder |
${/CORE_JAVA_TEMPORARY_FOLDER}$ |
Working folder to save the SAP table as a CSV file during the process. The default setting uses a temporary folder from Java. |
File Encoding |
UTF-8 |
Encoding of the file contents. |
Fetch Size |
1024 |
Number of lines to retrieve on each table fetch. |
Max Fetch Number |
0 |
Maximum number of lines to load. The default setting is unlimited, and loads all data. |
Row Separator |
\r\n |
Characters used to mark the end of a line. Possible options are:
|
IDocs
You can manipulate an SAP IDoc structure like an XML file.

Generating and sending IDocs

Before sending an IDoc to SAP, you must generate it.
-
Open your SAP metadata.
-
Find the corresponding IDoc element, and open its properties.
-
Add an input file mask to the In File Path parameter.
-
Add an output file path and name to the Out File Path parameter.

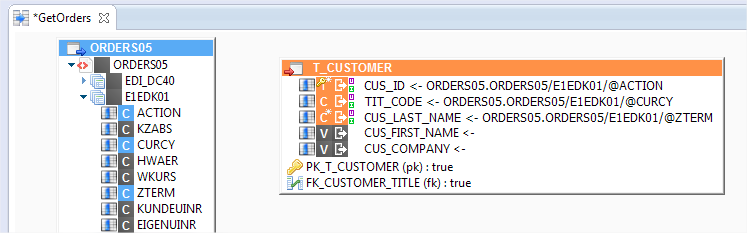
Next, create a mapping with a table as a source, and the IDoc as a target. Map your desired fields.
Open the integration template, and set the Send Idocs parameter based on your needs:
-
For a mapping that generates an IDoc but does not send it, uncheck the Send Idocs parameter.
-
For a mapping that sends the IDoc, check the Send Idocs parameter.

To check that a file was generated correctly, execute the mapping. Make sure the file you previously specified in the Out File Path was created. You should check file output before enabling the Send Idocs parameter.
Reading IDocs
-
Open your SAP metadata.
-
Find the corresponding IDoc element, and open its properties.
-
Add an file mask to the In File Path parameter, corresponding to files and directories that contain files to read.

Next, create a mapping with the IDoc as a source, and table as a target. Map your desired fields.
When the runtime executes the mapping, it reads the IDoc files related to the file mask. It then loads data into the target table.
Reading IDocs from a shared directory
You can set up a shared directory system for your IDocs with SAP and Designer actions. This allows you to work with that shared directory in an input file mask.
A possible setup would work as follows:
-
Create or open a process related to your IDocs integration flow.
-
Add a File action, and configure it to wait for files in the SAP output location.
-
Link this action to a File copy action, which copies the files to a shared directory of your choice.
-
Link these actions to your mapping, so it executes when files are available.
|
You can use this setup in other ways, such as developing a process that reads an FTP directory. This can be useful if you configure SAP so its IDocs are available from an FTP server. |
Reading IDocs from a recovery server
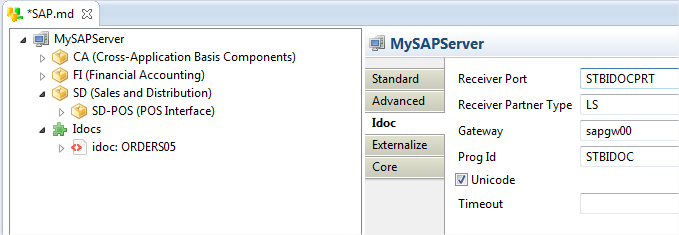
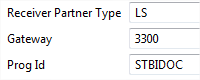
You can also read IDocs from a IDoc recovery server using the SapReceiveIDOC action. This action creates an IDoc recovery server that can receive IDocs from SAP, and writes them to a directory of your choice.
You have to configure SAP to transmit its IDocs to this server, and configure your metadata to communicate with SAP.
This screenshot shows an example configuration:
|
Under Windows, make sure to add the
|
-
Create or open a process to use as a server startup operation.
-
Add the SapReceiveIDOC action from the Process Palette, from the Connector section.
-
Drag and drop the IDoc metadata element onto the action.
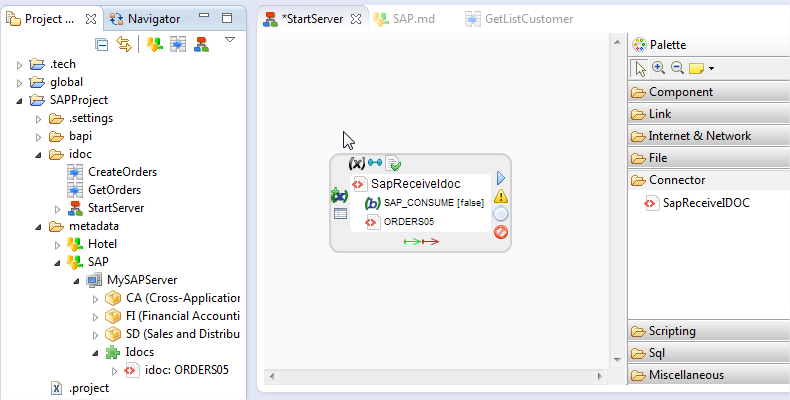
-
Open the action’s properties.
-
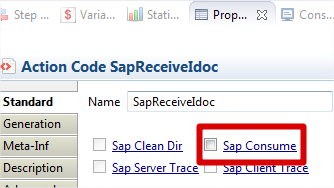
Uncheck the Sap Consume parameter.
-
Set the Out File Name to a mask of the location and name of the file you want to output.
-
If you want to tune how long the action waits, set the Sap Server Timeout parameter. The default is 10 seconds, written in milliseconds.
BAPI/RFC operations
In a BAPI/RFC metadata:
-
The inputs are under the ImportParameters node
-
The outputs are under the ExportStructures node.
-
Both inputs and outputs have a Tables node.

Invoking BAPI/RFC
To send data to a BAPI/RFC:
-
Create a new mapping.
-
Add the BAPI or RFC that you want to manipulate.
-
Add a database table as a source.
-
Map the fields.
-
Make sure to map the first field with a repetition rule that corresponds to the desired number of invocations.
-
Run the mapping.

Before invoking a function, you need to know how the input parameters should be defined. You can test this function with the SE37 transaction in SAP:
-
Go to transaction
SE37 -
Select the desired function.
-
Click F8 (test/execute) to start the test tool.
-
Fill in the parameters, and perform the function.
Reading BAPI/RFC output data
After setting up a mapping for invocation, you can set it up to read the returned answer.
Add a target table to the invocation mapping. Map the BAPI or RFC to the target table as output.

You can also create a second mapping to read the response.
DataSources
An SAP DataSource is an extension of an SAP Business Warehouse (BW). It consists of a set of fields that provide data for a business unit, for reporting purposes.
DataSources work as read-only, structured data. You can extract data from them like with a database source.
DataSources also support a delta mode to only load changes since the last data extraction.
Read a DataSource
This example demonstrates how to load a DataSource to an RDBMS table.
Start by reversing the desired DataSource.
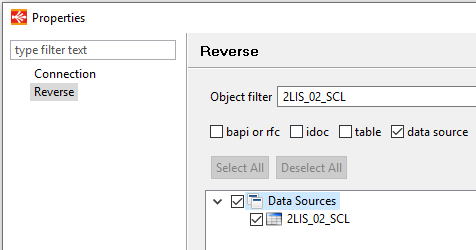
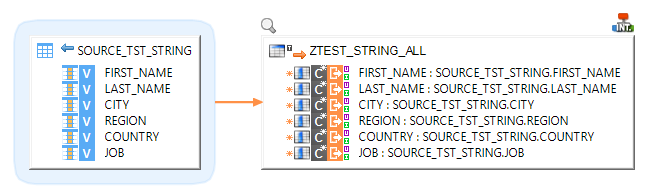
Create a mapping into which you drag and drop the SAP DataSource. The element looks like a source database table.

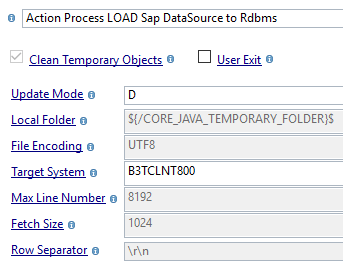
Add a target table, and map the source fields to the target based on your requirements. After mapping the fields, you can change the load template parameters.

The following parameters are available:
| Parameter Name | Default | Description |
|---|---|---|
User Exit |
false |
Extract the SAP DataSource with a user exit program. This option is better to use with significant DataSources. It avoids memory issues by chunking the extractions. |
Update Mode |
F |
SAP DataSource extraction mode:
|
Local Folder |
${/CORE_JAVA_TEMPORARY_FOLDER}$ |
Working folder to save the SAP DataSource as a CSV file during the process. The default setting uses a temporary folder from Java. |
File Encoding |
UTF-8 |
Encoding of the file contents. |
Target System |
Specifies an SAP connector used for writing entities. This parameter is used in delta mode. |
|
Max Line Number |
8192 |
Maximum number of lines to load. |
Fetch Size |
1024 |
Number of lines to retrieve in a DataSource chunk. |
Row Separator |
\r\n |
Characters used to mark the end of a line. Possible options are:
|
Run the mapping, and check the consistency between the SAP DataSource and the target table. The following images demonstrate an SAP source from transaction RSA 3 to a target table:

Read a DataSource in delta mode
You can read a DataSource in delta mode, which allows you to only extract changes since the last extraction.
Here is a summary of how to use delta mode:
-
Set a mapping to initialize delta mode.
-
Run the mapping.
-
Create a similar mapping, or edit the current one, and change the Update Mode.
-
Start using the latter mapping for future extractions.
Initialize delta mode
Run your mapping with specific load template parameters to initialize delta mode:
-
Set the Update Mode parameter to
C. This mode performs a full extraction, and readies the delta counters. -
Specify an SAP Target System.

This first run in delta mode does a full DataSource extraction, and initializes counters to track modifications for future runs.
DataSource additional information
Filters & joins
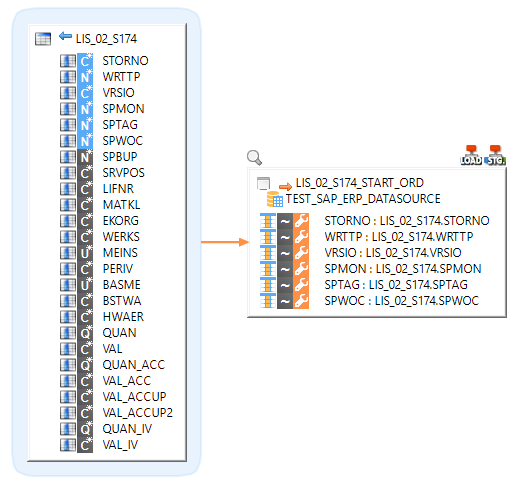
An SAP DataSource extracts all data. Filters and joins must be set to work in staging, not at the source.
The following example has a filter to only get data matching the conditions LIS_02_S174.EKORG = 1000 or LIS_02_S174. BSTWA = LIS_02_S174.HWAER:

The following example shows a join between GMVQTY and QUAN fields:
