| This is documentation for Semarchy xDI 2024.3, which is no longer supported. For more information, see our Global Support and Maintenance Policy. |
Control the execution flow
The execution flow of the process defines the sequence into which the steps run. In a process, you can control the step(s) that run first, and the step(s) that follow in case of success or failure.
Startup steps
By default, all the steps with no incoming links are considered startup steps. As a consequence, a process can start with several simultaneous steps.
In certain cases, (for example in the case of a process that is a loop) no step can be identified as a startup step. In these cases, you must explicitly indicate the startup steps by checking the Is Begin Action option for these steps.
| A process may have multiple startup steps and may run multiple steps simultaneously at any point of execution. |
Classic links
You control the execution sequence of steps in processes using Classic Links. Each link sequences a step that finishes (the previous step) with a step that needs to start (the next step).
A classic link is either:
-
A Successful Link, which runs the next step if the previous step was successful.
-
An Unsuccessful Link, which runs the next step if the previous step failed.
-
An Anyway Link, which runs the next step all the time.
| You can create a classic link of a type and change it to another type. For example, changing a Successful Link into an Unsuccessful Link. |
Create a classic link
To add a classic link:
-
In the Palette, select the Successful Link tool in the Link accordion.
-
Select a step in the package diagram. While keeping the mouse button pressed, move the cursor onto another step and then release it. A link appears between the two steps.
-
Right-click this link and then select Show Properties View.
The properties view appears. -
In the link properties, set the generation and triggering options:
-
Generation Type: Define whether this link should be generated depending on the previous step status (Successful, Unsuccessful) or always (Anyway).
-
Execution Type: Define whether this link should be triggered depending on the previous step status (Successful, Unsuccessful), or always (Anyway).
-
Triggering Behavior: Define whether this link is Mandatory, Inhibitory, or Not Mandatory for the next step to run.
-
Optionally set Generation and Execution Conditions for this link.
-
-
Press Ctrl+S to save the process.
For more information, see how to use scripts in conditions.
| A different type of link, the Bind Link, is available to perform step repetition based on the result of a SQL Query. |
Sample processes
The following processes illustrate the use of the classic links.
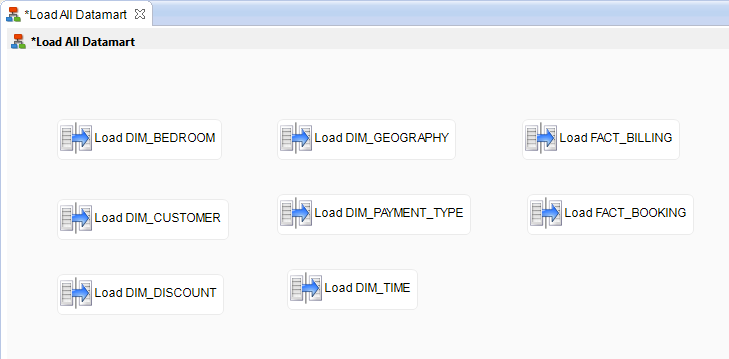
This first process has no link. All the mappings start simultaneously with the process.

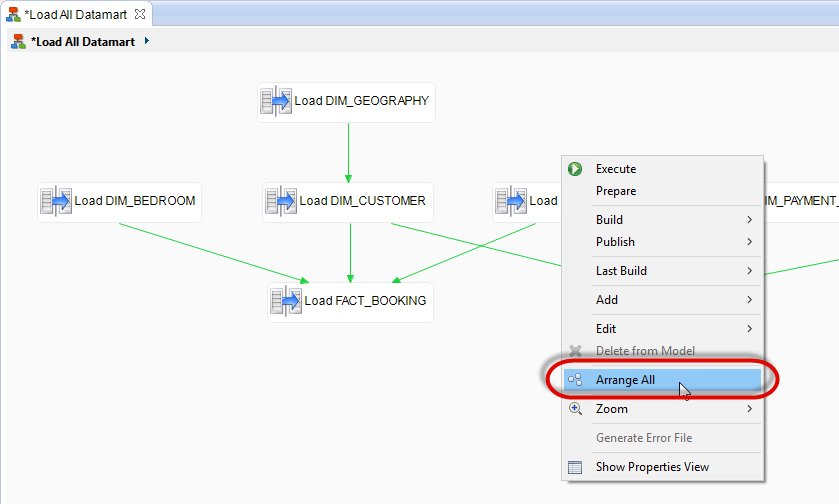
After linking these mappings with classic links, certain mappings will start after other mappings are complete. For example, the Load DIM_BEDROOM will start with the process, but Load_FACT_BOOKING will only run if Load DIM_BEDROOM, Load DIM_CUSTOMER, etc are successful.

| Using the Arrange All option automatically organizes the process diagram. |
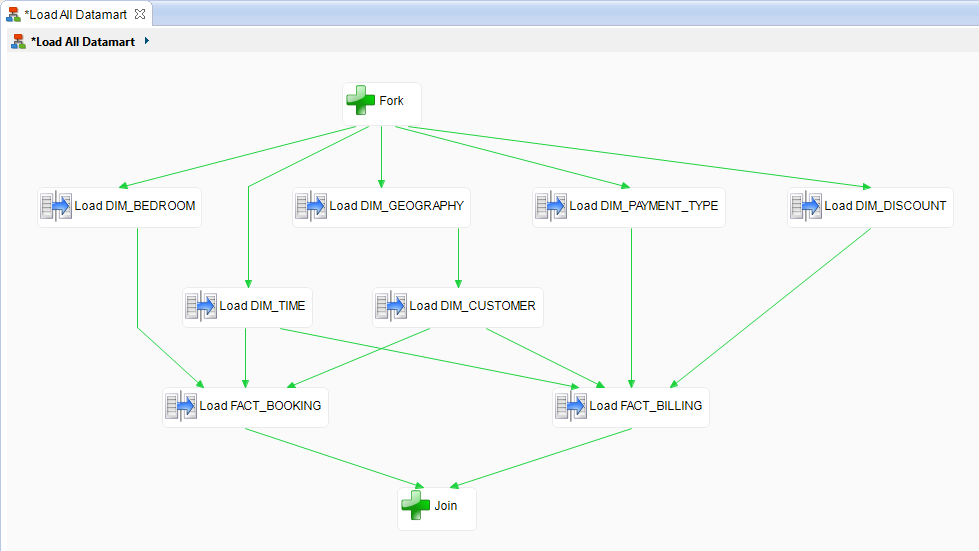
This third process is organized to start with an Empty action named Fork. This action does nothing in the process but allows defining a visible starting point. It is followed by five mappings that will run in parallel and trigger subsequent mappings. All the mappings rejoin in the Join empty action, which completes the process.

| Use the links to sequence mappings and actions that have dependencies. In the above example, the mapping load tables in an order that follows constraints. |
Link generation and triggering
In a running process, a link, depending on its configuration and previous step status, can be:
-
Generated, which means that it appears and exists in the running process instance.
-
Triggered, which means that it sends a signal to the next step in the running process instance. Only generated links may be triggered.
At execution time, when a step completes:
-
The step completes with a successful or unsuccessful status.
-
Links starting from this step - this step is considered the previous step - are generated if:
-
The Generation Type specified for the link matches the previous step status or is Anyway.
-
The Generation Condition is met.
-
-
Links that were generated are triggered if:
-
The Execution Type specified for the link matches the previous step status or is Anyway.
-
The Execution Condition is met.
-
-
The next step runs depending on all its incoming links' Triggering Behavior:
-
A step with multiple incoming Not Mandatory links (and no other) starts if any link is triggered.
-
A step with multiple incoming Mandatory links (and no other) starts only if all links are triggered.
-
A step with one incoming Inhibitory link will not run if this link is triggered.
-
|
The default configuration for links is to always be generated (Generation Type=Anyway), triggered if the previous step is successful (Execution type=Successful) and Mandatory for the second step to execute. |
| Links with a generation or execution condition appear as dotted links. |
Execution conditions
Expressions and variables control execution conditions.
For complex expressions, use scripting languages to define your conditions.
Variables
You can use session variables to define execution conditions. Express them with the syntax ${variable}$.
DirectBind links have bind variables that have their own syntax: :{variable}:. To use them in an execution condition, you must wrap the expression in special scripting tags: %b(rhino){...}b(rhino)%.
When a script is more complex than a single expression, you can also use __ctx__.retvalue a context variable to return a Boolean value to the condition.
Examples
Single expression
A basic condition check can be a single expression. The following condition checks whether the AUTOMATION step has an execution count equal to 1, using the CORE_NB_EXECUTION session variable.
${./AUTOMATION/CORE_NB_EXECUTIONS}$==1Bind execution condition
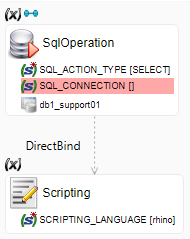
This example has an SQL operation action that runs a SELECT statement, and returns the column val. It has a bind link to a scripting action that prints the value of the :{val}: bind variable with the code println(:{val}:);. However, the scripting action should only run when val is not equal to 1.

The bind link can have its own condition. Its expression contains the following code:
%b(rhino){":{val}:" != "1"}b(rhino)%The %b(rhino){...}b(rhino)% delimiter tags allow the condition to be evaluated in the bind context, and use the :{val}: variable.
For more information, see the page about scripting.
Manage automatic restarts
A process that failed does not try to restart automatically unless you explicitly set it to do so. Set the the Meta-Inf properties <autoRestartNumber> and <autoRestartInterval> to activate automatic process restarts:
-
In the process, go to the process Properties.
-
Open the Meta-Inf finger tab.
-
In the text field, add one or both of the following lines:
<autoRestartNumber>5</autoRestartNumber> <autoRestartInterval>1000</autoRestartInterval> -
Set the values between the tags.
-
autoRestartNumbersets the number of restart attempts. -
autoRestartIntervalsets the waiting time between a failure and a restart, in milliseconds.
-
Restart points
When a process restarts after a failure, it tries to restart from the steps that had an error status by default. You can also define specific Restart Points on steps to define where the process should restart.
Each step may be marked to Open or Close a restart point. A process failing between an Open Restart Point and a Close Restart Point restarts at the previous Open Restart Point.
You can define several Restart Points Open and Close. If the process fails, it always will restart, for each failing step, on the last Open Restart Point before the failed step.
To open a restart point:
-
Right-click the step in the process
-
Choose Restart Point > Open.
The following icon appears on the step
To close a restart point:
-
Right-click the step in the process
-
Choose Restart Point > Close.
The following icon appears on the step
To remove a restart point:
-
Right-click a step in the process with an open
 or close
  restart point.
 -
Choose Restart Point > Default.
The restart point marker is removed from the step.